In molti giochi certe cose devono succedere in certi momenti.
Puoi provarci utilizzando gli eventi Alarm … ma quando le cose diventano troppo complicate questo non funziona più.
La risorsa time line, temporizzatore, è pensata per questo.
Nel temporizzatore specifichi quali azioni devono succedere e in quali momenti.
Puoi usare tutte le azioni che sono disponibili per i diversi eventi.
Dopo che hai realizzato un temporizzatore puoi assegnarlo all’istanza di un oggetto.
Questa istanza eseguirà le azioni ai momenti di tempo specificati.
Spieghiamolo con un esempio.
Questa guardia deve muversi 20 passi a sinistra, 10 verso l’alto, 20 a destra, 10 verso il basso e poi fermarsi.
Per riuscirci crea un temporizzatore che comincia impostando un movimento a sinistra.
Al momento 20 imposta un movimento verso l’alto, al momento 30 un movimento a destra, al momento 50 un movimento verso il basso e al momento 60 ferma il movimento.
Adesso puoi assegnare questo temporizzatore alla guardia e la guardia farà esattamente quello che hai pianificato.
Puoi usare un temporizzatore anche per controllare il gioco più in generale.
Se cominci a utilizzarli capirai che sono oggetti molto potenti.
Per creare un temporizzatore scegli la voce Resources > Create Time Line.
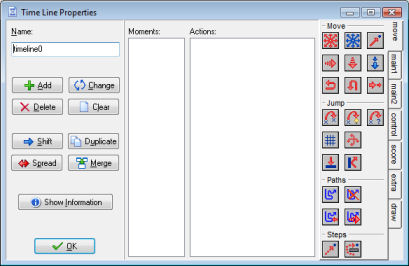
 Apparirà la finestra
Assomiglia alla finestra delle proprietà di un oggetto.
A sinistra puoi impostare il nome e ci sono dei pulsanti per aggiungere, modificare… i momenti.
Poi c’è la lista dei momenti.
Questa lista specifica i momenti tramite il numero di step al quale dovranno avvenire le azioni assegnate.
Poi c’è una lista di azioni per il momento selezionato e infine ci sono tutte le schede con le azioni disponibili.
A sinistra ci sono i pulsanti seguenti
Add
Make sure you do not create negative time moments. They will never be executed.
Now you can drag actions to the list as for object events.
Change
Delete
Clear
Shift
Duplicate
Spread
Merge
Show Information
Ci sono un certo numero di azioni, disponibili in modalità avanzata, collegate ai temporizzatori.